Friday, August 5, 2011

Life By the Numbers

In the last 48 hours:


10 music students taught

9 stitch markers dropped while working on the Omelet Shawl (thank goodness for plastic straws!)

8 pounds of peaches ready to be made into jam

7 episodes of Mad Men watched (while spent on #6)

6 hours of re-organizing the school room to get rid of broken toys/mostly filled notebooks/things we no longer use or the boys have outgrown

calls to try to fix problems with the fall schedule in the studio

4 loads of laundry washed, folded and put away

3 hours in rehearsal

2 hallways freshly painted

1 finished Little Red Cardi minus buttons


Thursday, August 4, 2011

Sewing a Kindle Cover


One of our recent acquisitions for homeschooling is a kindle. There are several books we are planning to use for school this year and in the next few that are available as free or nearly-free e-books. After weighing the cost both ways it was decidedly cheaper and more convenient to go with the kindle.


It doesn't hurt that this will also cut down on our purchase of physical books {you know- the ones we just don't have space for in this little tiny house}. What I needed next was a cover.


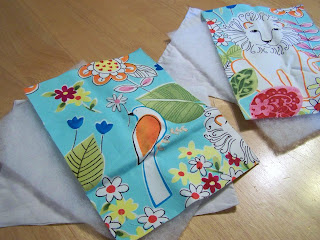
As most sewists do I have scrap material from projects and a bit of a fabric stash too. I dug in there and came out with a little bit of an older Alexander Henry lion print that I love along with a little bit of leftover quilt batting and muslin.


You will also need about 12 inches of bias tape to finish the top edge as well as a button and whatever you'd like to use as a button loop. I used about 4 inches of bias tape for my loop because that's what I had on hand at the time.


I cut all three layers to the same size. The kindle is about 7 1/2 inches by 5 inches so I cut my rectangle to 8 3/4 inches by 6 1/4 inches to account for seam allowance.


1. Sew together the muslin layers (or whatever you choose to use for lining.) on 3 sides, leaving one of the 614/" sides open. I used a 1/2 inch seam allowance and then trimmed the edges down. If you use a heavier fabric you can trim the corners down for less bulk, but I didn't have any problem with leaving mine untrimmed.


2. I embelished the outer fabric with beads and embroidery- you can do this step or not, but I like the extra special something it lends.


3. After embellishing the outer fabric I stacked one outer panel on top of one piece of batting and stitched them together around the outer edge. Do the same with the other outer panel and batting.


4. Place the outer panels together with right sides facing and sew them together on the left, right and bottom sides, leaving one of the 6 1/4" sides open like you did with the lining. Trim the bulk from the edges and corners and then turn your little bag right side out. I used a 3/8 inch seam allowance here.


5. Slide the lining inside the bag you just made out of the outer fabric and batting. Line up the seams and top edges (pin if necessary) and then stitch around the top edge. This stitching won't show when you're done- it's just to hold all the layers in place.


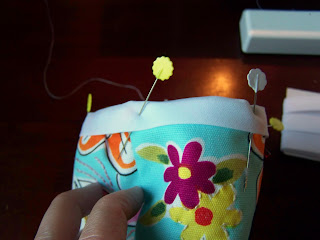
6. The next step is to make a loop for the button and to bind the top of your bag. I used a little bit of left over packaged bias tape but you can use anything you like. I cut a length for the loop that would fit around the button I wanted to use plus about 2 inches. Make sure when you place the loop that you place it on the inside of the bag and upside down like shown above, lining it up with where you'd like your button to go on the other side.


Pin the loop in place.


7. Cut another length of bias tape for the top binding with enough extra to be able to fold the raw ends under. pin it in place.


That will make a nice bound edge with that little loop sticking out of one side.


8. Attach your button to the side you'd like it placed on, and your loop should fit right around that button.


Slide your kindle in and admire your beautiful case!

Tuesday, August 2, 2011

Yarn Along


Knitting along with Ginny this week...


I've been a sweater knitting fool here. My little red cardi is down to needing about 2 hours of TLC to be finished- one more sleeve and I'm done! Then ends to weave in and buttons to hunt down. I'm heading to another LYS this weekend on a serious button quest because last weekend resulted in ZERO buttons for my lovely green textured tunic.


I am fortunate to have 3 "L"YS's. The closest is about 20 minutes from me, then the other two are about 45 minutes from here, but well worth the trip every few months. And of course they are in 3 different directions. I made a trip to the closest one last weekend and didn't find any satisfactory buttons for the project so I'm making the 45 minute trip to the one with the best chance of having great buttons on Saturday. Five buttons for the green tunic and six for the red cardi... and if they don't have a good option I'll head into Joann's and Hobby Lobby close to home.


I didn't include it in my sweater photo, but I just started reading When I Lay My Isaac Down on the kindle. I'm also finishing up Delirium, but it's easier to take the kindle places lately since it also carries many books the boys like too. I made a case for it so that it stays safe in my purse (I'll post the tutorial later this week) so it pretty much goes everywhere with us now.


Next up in knitting is mittens. I'm mostly done with the boys' mittens, but I need to get to my own before long and then on to hats. There are so many mitten patterns I love that I'm having a very hard time narrowing it down.


Do I go with the Fiddlehead Mittens that were one of my first favorites on ravelry? Or how about the 5-1 mitten from the Magnificent Mittens book I love so much? Then there are the Ruba'iyat Mittens that I actually cast on last fall but then ripped out, and many more. Suggestions? Favorite mittens of yours?

August


We've been practically living at the pool the last few weeks in this heat.


Today is supposed to hit 104 without the heat index. I can't imagine how hot it's going to feel with the additional humidity.


We've made and eaten popsicles almost every day for the last several weeks.


I don't see that trend ending any time soon...


Only five more days of work in the studio this month before we take time off

to really enjoy these summer days,

to work our way into the school year with grace,

and to prepare our hearts for the things coming our way this year.

Monday, August 1, 2011

Try New Things (It Won't Kill You)

When it comes to trying new things I'll admit it: my natural reaction is to just say no. I've had to learn to be flexible over the years and to roll with what comes. That's how life is, right? It keeps moving along whether we adapt willingly or get caught up in the flow kicking and screaming. So in the name of making life less stressful I choose to go along with what comes our way. It makes for quieter living and I'm a big fan of that.


The thing is, that natural bent toward saying no to the new leaks into every area of your life, even the places that don't matter as much in the grand scheme of things. After all- since when did messing up a knitting project affect your value as a human being? There's no reason not to be adventurous in knitting and yet it's easy to find yourself congratulating yourself for even learning to knit in the first place. You tell yourself that just knowing the knit stitch is enough because the very thought of trying to learn lace or bobbles or cabling gives you a little panic attack.


And another moment of honesty: while I feel pretty daring in my knitting endeavors, the very thought of steeks makes me want to pass out.


But it's still on my list of things to try some day, probably following Elizabeth Zimmermann's recommendation to lie down afterwards.


It all comes back to my knitting philosophy

You can always take it back out if you make a mistake.

If it doesn't work you can just try again.


Pick a Project and Go.

It really is that simple. The key is to pick something you really love- a project that you feel drawn to every single time you see it. One of those projects for me was the February Baby Sweater and I learned a *lot* from it. A little bit of lace, more about sweater structure, button holes- it was a good project with just the right amount of difficulty for where I was at the time.


So how can you find a project that is going to help you gain new skills
without being too difficult for your skill level?


1. Read the directions all the way through.

After you find that pattern that you love, read through everything in the directions- every last little line. Check out the new skills you'll need to learn and take a few minutes to watch videos on youtube or knittinghelp.com to decide if you're ready to attempt those skills.


2. Practice on a swatch.

Not sure if you can do it? Try a swatch. Cast on 32 stitches or so and knit in stockinette for several rows. Then try out the new skill. Try out yarn-overs or bobbles of k2tog- whatever it is that's making you nervous. On a swatch it's okay if your count is off or it doesn't look like anything and it gives you a chance to practice practice practice until you feel comfortable.


3. Know when to quit (and try it again later).

Sometimes you might over-reach and go for something a little too big for where you are right now. That's okay- remember that you can always rip it out and try again. I attempted a lace vest that was waaaaay beyond me about two years ago and I ripped it back several times before giving up completely. It's back on my list for this fall because after a little more beginner lace work and more experience with sweater construction I feel much more confident about working on the project.


How do you feel about trying new things? Nervous? Adventurous?


What have you tried lately that's new to you?
Related Posts Plugin for WordPress, Blogger...